
Use the Battery Test App to perform tests on vehicles brought in for service using test parameters determined by the VIN of the vehicle being tested.
Battery Test
1. Start your battery test by connecting the Tester Pod test clamps to the battery (Black to negative [–], Red to [+]).
2. Press the Controller Release Lever and disconnect the Controller from the Tester Pod.
3. On the Controller at the Main Menu tap the Battery Test icon.
4. Select the user running the test and whether the test being performed is In Vehicle or Out of Vehicle.
5. Once you have made your selections, it will advance to the connect clamps screen. Ensure your clamps are properly connected to continue.
6. If you selected In Vehicle test, it will advance to the test in progress screen followed by the temperature capture. If you selected Out of Vehicle, you will be prompted to fill in the battery specifications, following by the temperature capture and battery test progress screens.
7. For In Vehicle selections, a VIN list of the available VIN’s at your location will pop up. Select your vehicle to proceed. If your vehicle is not displayed, you can manually capture via the onboard camera, or type it in via the keyboard.
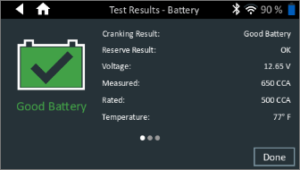
8. Once you have selected the vehicle or battery specifications and the test completes, it will display a result screen based on your In Vehicle or Out of Vehicle selection.
In Vehicle Example Result:

Out of Vehicle Example Result
9. Select Done for the results to then be sent to the server to be available on your service tablet. If there is an issue sending the result you can try to re-send or select to send later. You will then return to the Home screen.